- STEP 1: Download the Yi IoT app.
- STEP 2: Connect the camera to the adaptor.
- STEP 3: Switch on the cam, you will notice a red light initially for 6 secs.
- STEP 4: Then intro sound.
- STEP 5: Left, right, down, top, straight.
- STEP 6: Insert Memory Card / SD Card(Memory Card inserted sound).
WiFi Camera FAQ
- STEP 1: Select Country and continue to click sign up in login page.
- STEP 2: Enter details (Note: after clicking next, if you get Invalid captcha, try again).
- STEP 3: An activation link will be sent to your email. (Note: resend email if not sent) Go to your emai and click link that says “Action Required to Activate Your YI IoT Account” and then click link inside. You will be redirected to success page after which go back to app and click back from link screen.
- STEP 4: Log in by entering the credentials and swipe through the intro pages and allow app to access photos and media.
- STEP 5: Click screen to remove try now and tap Press + on top right to add cam.
- STEP 6: After allowing app to access device location, click WiFi Connection.
- STEP 7: Wait 20 seconds until you hear a 2 tone sequence (Note: If no beep is heard within 30 secs, press reset 5 secs and red light intro sound and turning will come and now wait for another 20 secs).
- STEP 8: Connect to your WiFi by giving Wifi Username and Pwd (2.4 Ghz and 5 Ghz) and Scan qr code by placing screen close and click waiting to connect after hearing “connecting to wifi”.
- STEP 9: After it says wifi is connected, wait for a min and after Pairing is successful, you will hear a “you can start using your cam now” voice and you will be taken to another page. there put device name.
- STEP 10: To continue without paying, Click Premium cloud services and then click give up and then Click you may now start using your cam.
- Home Screen: This is the screen that should show even when you exit and come back to the app. Click play to view cam.
- Alert Screen: All the motion detected alerts will be recorded here.(Note: Motion Detected Videos will be recorded for just 6 secs. For recording ful videol, you have to either purchase a cloud or adjust sd card settings to” all time recording”).
- Cam Full Screen features: View the below images to learn more about all the features.
Go to settings and Toggle for switching the camera on/off while its plugged in Note* While switchin on the camera again, wait for up to 30 secs for the camera to show the live feed on the app.

Go to settings and then camera settings. Then toggle to rotate cam view to 180 degrees if you have fixed the cam on top the roof.

Toggle on to capture sound from Camera and in the screen click the speaker icon.

Go to camera settings and select your location time zone.

- Colorful Night Vision (Cam Light will be switched on, used for dark rooms, any object/person will be visible in full color under the cam’s view).
- Black/White Night Vision (Only black and white view(normal night vision).
- Smart Colorful Night Vision (Cam light will be automatically switched on when it detects any person/object moving past it at night/pitch black room).

Go to smart detection in settings enable motion detection for camera to track motion of any person/object that passed by the cam.
In settings go to Echo Show for connecting the Camera to Alexa Click side arrow and Enable Camera Stream and read instructions below to use Alexa for the camera

- All time recording: Records all time no schedule.
- Custom: Set recording time (for eg when you are not at home/office).
- Format storage Card: (Note* We recommend you to save all the data from the SD card before formatting it).

You can purchase a plan for cloud storage or you can buy an SD Card for 128 GB for more storage space.

- Motion Detection: Toggle on for camera to detect Motion.
- Sensitivity Level: Choose cam sensitivity level based on your need of security.
- Alert Frequency: Select how often you want your alert to be sent.
- Schedule: Schedule alert time within a time frame.
- Alarm Drip: Toggle on for alarm sound when a motion or a sound is detected.

Go to Setting, under notification setting to enable saving videos and photos and push notifications.

To check Current Network Connected Status.
To remove camera from your account, scroll down the settings page and click delete cam.
Note:
- Save all sd card info before removing.
- To add camera again, press reset in camera and follow the connecting steps again.
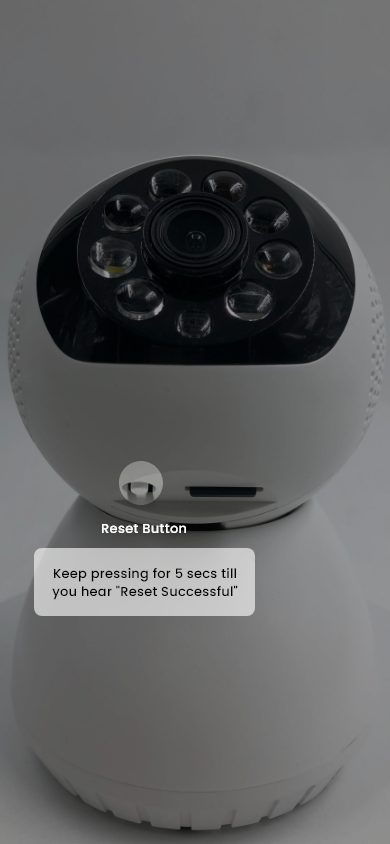
In the camera, move the camera head upwards and you will find the reset button and sd card slot. To reset, click the cam for 5 seconds till you hear reset successful. (Note: During Initial Setup, If no beep is heard within 30 secs, press reset 5 secs and red light intro sound and turning will come and now wait for another 20 secs).
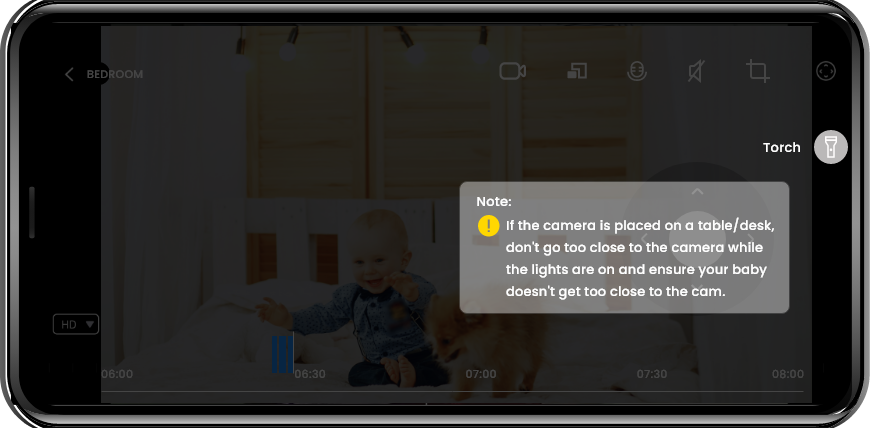
Go to the camera screen and click torch icon and then click ‘On’. Caution: Please dont bring your pet or baby too close to cam while the flashlight is on as it might cause irritation and harm to their eyes.